
Another battle between the eternal enemies Rome and Carthage, this time with a new playtester, Ash, who showed real tactical acumen in what was his second Optio game. We had done Rome vs Carthage before but then Ash was learning the ropes. Now he had got the idea - as this game made evident.
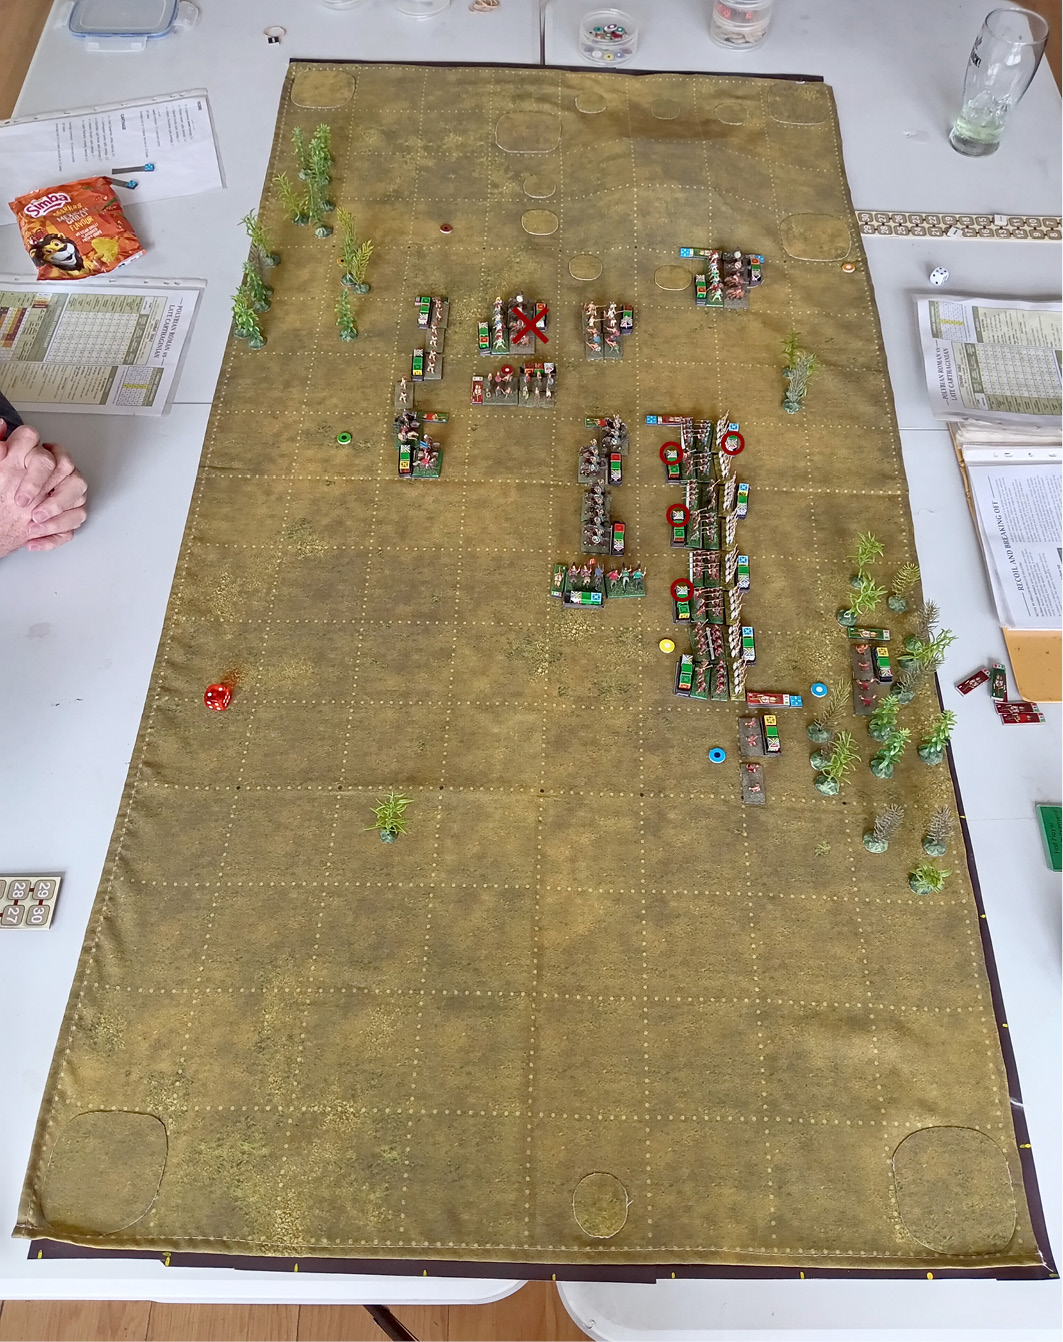
Ash led Rome, yours truly Carthage. The pre-battle terrain game gave us this terrain (Ash is green, me red, BTW):


Which we then set up.

After which we deployed the armies. Our generals had the same command rating, so we threw dice (yes, dice!) to decide who would start deployment. I lost the throw and started deployment, putting 1/3 of my army down, followed by Ash putting 1/3 down and so on. Rome on the left, Carthage on the right.

My plan was to keep my Poeni infantry back and outflank Rome on her right, using my slingers to soften up the Roman right flank cavalry and the legion there. At the same time my Warband would win on my right, helped by my LH. When the Legions advanced I would then be able to envelope them on both flanks.
Ash had a simpler plan: advance the Legions forward at top speed and crush everything in their path. Not a bad idea.
Turn 1. Carthage.
Having deployed first I moved first. Following my plan, I moved up my flank units and held back my centre.

Turn 1. Rome.
Ash began executing his plan: crank up the steamroller and start clanking forwards

Turn 2. Carthage.
My Slingers were now in range to do their thing. After thinking about it for a bit, I moved my cavalry wide to the left in column. I wanted to be able to engage the Roman Cav from the flank without being caught in column - columns get in trouble if too close to enemy units in line.
Meanwhile my LH got into range to start shooting up the Roman Auxilia unit not in the woods (you can't shoot into woods). But here I made a mistake in moving up my Warband behind them.

Turn 2. Rome.Ash advanced all across his line, the steamroller in fifth gear. His Auxilia advanced, charging my LH who did the sensible thing and evaded - and now found they had backed up against the Warband and would not be able to evade again. Blistering barnacles! (to quote a certain sea captain).
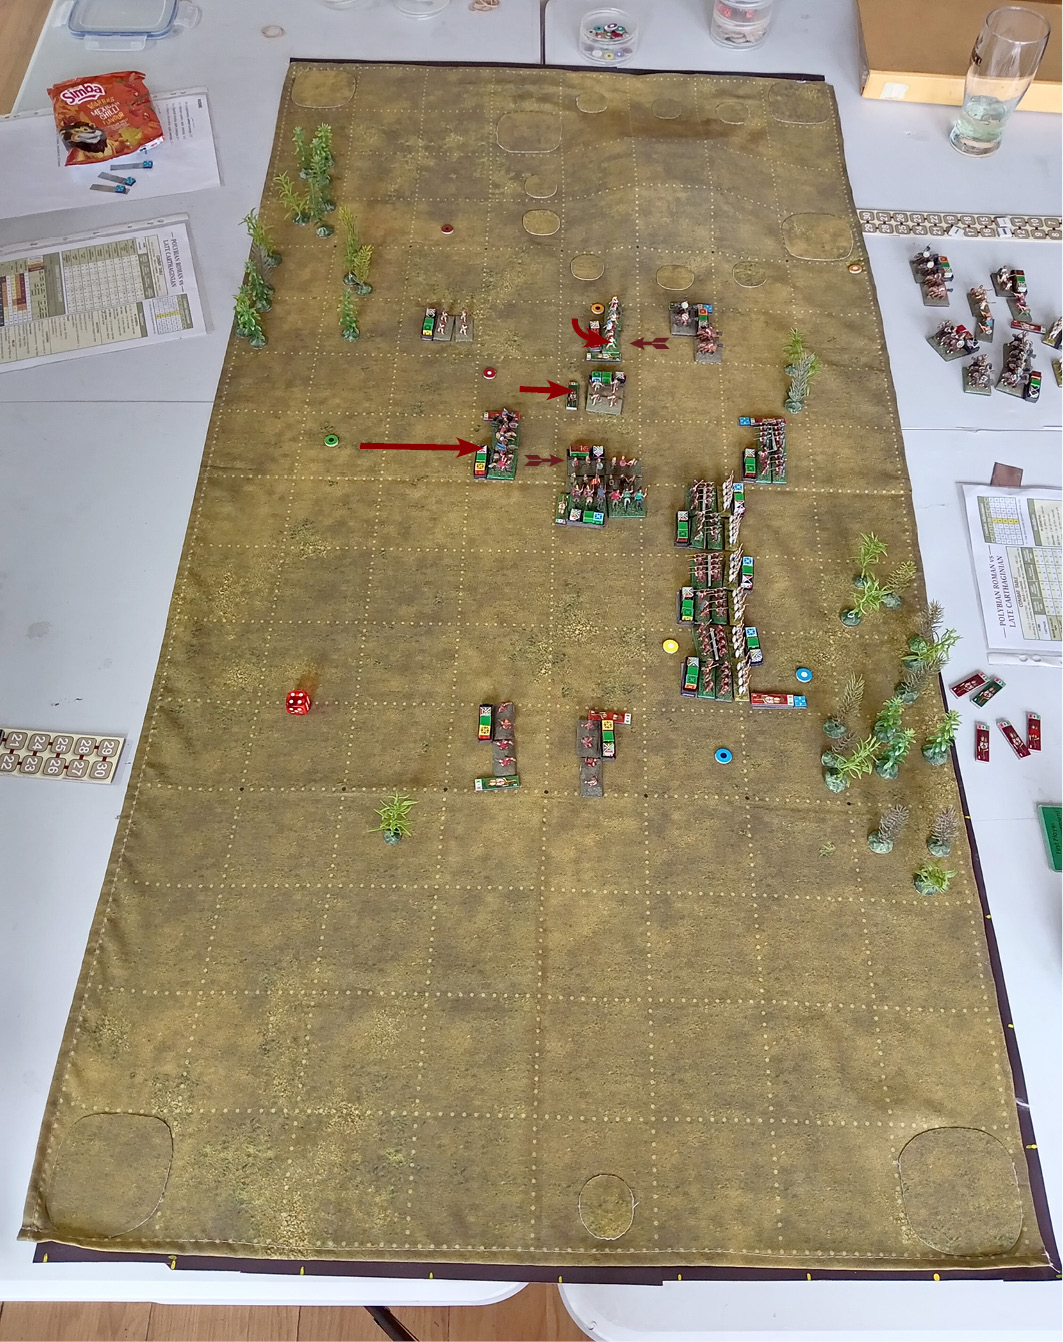
The smaller arrows with fletches show who is shooting at whom. Each player can shoot during his and his opponent's move, i.e. twice a turn, though modifiers can drop that to once a turn or even not at all.

Turn 3. Carthage.
Time to get my Medium Cav into the picture, whilst my LH chuck javelins for their lives.

Turn 3. Rome.On comes the steamroller. On his left Ash charges with his Auxilia and Cavalry. One Numidian LH unit evades, the other can't and must take the charge on the chin. The other Roman Cav unit on Ash's right charges the Slingers who evade into the wood. The legions are getting close to the Poeni infantry....

Turn 3. Melee.Nobody routs. Yet.

Turn 4. Carthage.Here I made a mistake. Ash's rear was open and I was getting worried about the Legions approaching my Poeni foot, so I decided to send my Medium Cav to the rear of the Legions and prepare to charge them there. That of course assumed Ash wouldn't try to do anything about it. Assumptions of course are the mother of all [deleted] unfortunate events.

Turn 4. Rome.Ash seemed unconcerned about my Cavalry in his rear, keeping up the advance of his Legions that were now nearly upon my Poeni foot. His Medium Cav engaged with the Warband broke off (cavalry may break off from infantry before melee), whilst his Skirmisher Foot sought shelter in the woods and his Auxilia began to drive against my unengaged LH unit. I chuckled to myself - my Cavalry in his rear were going to wreak havoc!
We forgot to resolve the melee fight between the Roman Auxilia and the Numidian LH units. Never mind - those LH are dead anyway. So on to
Turn 5. Carthage.
Thinking about it, I decided was it better for my Poeni foot to charge the Legions right away. If they waited, the Velites would be able to pepper them, dropping a morale interval. In you go, lads!
My Medium Cav formed line and move into range to shoot up the Legions from the rear. I would have loved to charge them right away however a unit cannot charge in the same turn it executes a formation change, in this case from column to line. My Warband move up to keep that Carthaginian Medium Cav unit busy. Things seem to be going Carthage's way....

The main lines engaged in furious struggle.


Turn 5. Rome.
....and then they don't. Ash brings his right flank Cav unit over against my Cavalry and succeeds in disengaging his other Cav unit from the Warband by a 180 degree about face, followed by a move out of ZOC, then a second 180 degree turn (possible for agile units), and a diagonal move towards my Cavalry. He has got my cavalry between a rock and a hard place. Thundering typhoons!
His Auxilia keep pushing against my LH, but they are collecting a lot of javelins in the process.

Turn 5. Melee.My LH are now shaken, but so is Ash's rightmost Legion, already badly shot up earlier by the Slingers (never underestimate light troops if they are given enough time to do damage).

Turn 6. Carthage.I have no choice but to turn my Medium Cavalry to face the threat of Ash's own cavalry. Meanwhile my Warband also turn to try and get into the action. I will have to beat off Ash's cavalry and then attack the Legions from the rear if I'm to have any chance.

Turn 6. Rome.
ZOCed from two directions, Ash's Medium Cavalry are free to move straight back out of either ZOC, and he chooses to move out of my Cavalry's ZOC. His Skirmisher Foot move up to harass my Warband and his Auxilia finally get to charge into contact with my LH, who choose not to run away this time.

Turn 6. Melee.My one LH unit finally routs, whilst the other draws against the Auxilia and both drop a morale interval - and that Auxilia unit is now close to routing. Meanwhile the battle rages between the Poeni and the Legions, and several Legion units have become shaken - but they have line relief up their sleeves.

Turn 7. Carthage.
I get busy, moving up my one Cav unit to clear the way for the Warband who move in behind my other ZOCed Cav unit that is doomed anyway. The other Warband unit charges one Auxilia unit and my LH donates a few javelins to the second Auxilia unit before pulling back.

Turn 7. Rome.Ash charges with his Cavalry and moves up his Skirmisher foot in support whilst his Auxilia now have my LH against the edge of the battlefield. I'm beginning to have a really bad feeling about the whole situation.

Turn 7. Melee.Three of my Poeni units are now shaken, and one of my Warband units routs. Definitely not looking good for Carthage.

Turn 8. Carthage.I get some comfort as my LH finally shoot the Auxilia to rout. Meanwhile I try to move my Slingers up and into the fray.

Turn 8. Rome.Ash does get his Skirmisher Foot into the fray by forming line and shooting up my embattled Cavalry. His surviving Auxilia unit starts to follow suit.

Turn 8. Melee.One of my Poeni infantry units finally routs, as does one of my Cavalry units. My other Cavalry unit and a Roman Cavalry unit fight each other to a mutual rout, which means they keep their morale at one interval above routing and break off from each other. They're exhausted and disengage for a short rest.

Turn 9. Carthage.Ash's Skirmisher Foot shoot my battered Cavalry unit that finally routs. Damn! I send in my Warband against the Roman Cavalry, but my commander is killed in the charge. Damn again! My only consolation is my LH unit, that moves up and donates a few javelins to the Auxilia. My Slingers also move but are still out of the fight.

Turn 9. Rome.Ash moves up his Cavalry, supported by his Skirmisher Foot, to harass my embattled Warband. His Auxilia turn to face the LH unit. The Auxilia are shaken, but no worries. Ash can already smell victory.

Turn 9. Melee.And victory arrives. Ash's rightmost Legion unit finally routs, but two of my Poeni foot units and my Warband unit rout. That is enough to tip the army over the edge and create a general desire to practise diplomacy by conventional means. Game over!

The moment of victory. It is always important to let playtesters win their first games so they keep coming back for more, that's what
I say.

The sun sets upon the victors and the vanquished.

Here is a link to a pdf version of the battle report optimised for cellphones.


I say that letting a newbie win his first game increases interest and pays dividends over the long haul. Cunning plan. Nifty looking game.
ReplyDeleteActually I don't need to deliberately lose (far too bloodthirsty for that). I'm so busy concentrating on how the game mechanisms are working that I forget to pay attention to tactics. I imagine that's a common problem for game designers. (:-(
ReplyDeleteI experience the same when I am playing and hosting a game. Switching hats and perspective is not always frictionless. This often leads to defeat.
DeleteAs usual a most professional AAR Justin. Likewise for the Website. Can understand losing whilst getting lost in a tangle of rule mechanisms. (As I discovered trying to sort out Battlecards and controlling Unruly Zombies, in my Triumph! Fantasy/historical on Saturday!)
ReplyDeleteI'll be worried about your position in the club ancients league if this goes on Justin : ) Anyway, as already remarked, a good report. You seem to get a good balance between text and image, which keeps the reader (well, me at least) engaged.
ReplyDeleteThanks Anthony. :-)
ReplyDelete...and Shawn. ;-)
ReplyDeleteI've added a link to a pdf of the battle report that should work well with cellphones.
ReplyDelete