
Rome vs Carthage yet again - but this time with a difference. Following an interesting thread on TMP, I tweaked the Command and Control rules, making the following two changes:
Battlelines of other commands that are directly in front of, behind, or alongside the general's battleline can be moved as an extension of the general's battleline, i.e. the general can freely move the block of battlelines as a single entity.
- Commanders moving independently of the general follow normal rules but once they started moving they are obliged to move at least one square per turn, spending a command point to either stop or change direction.
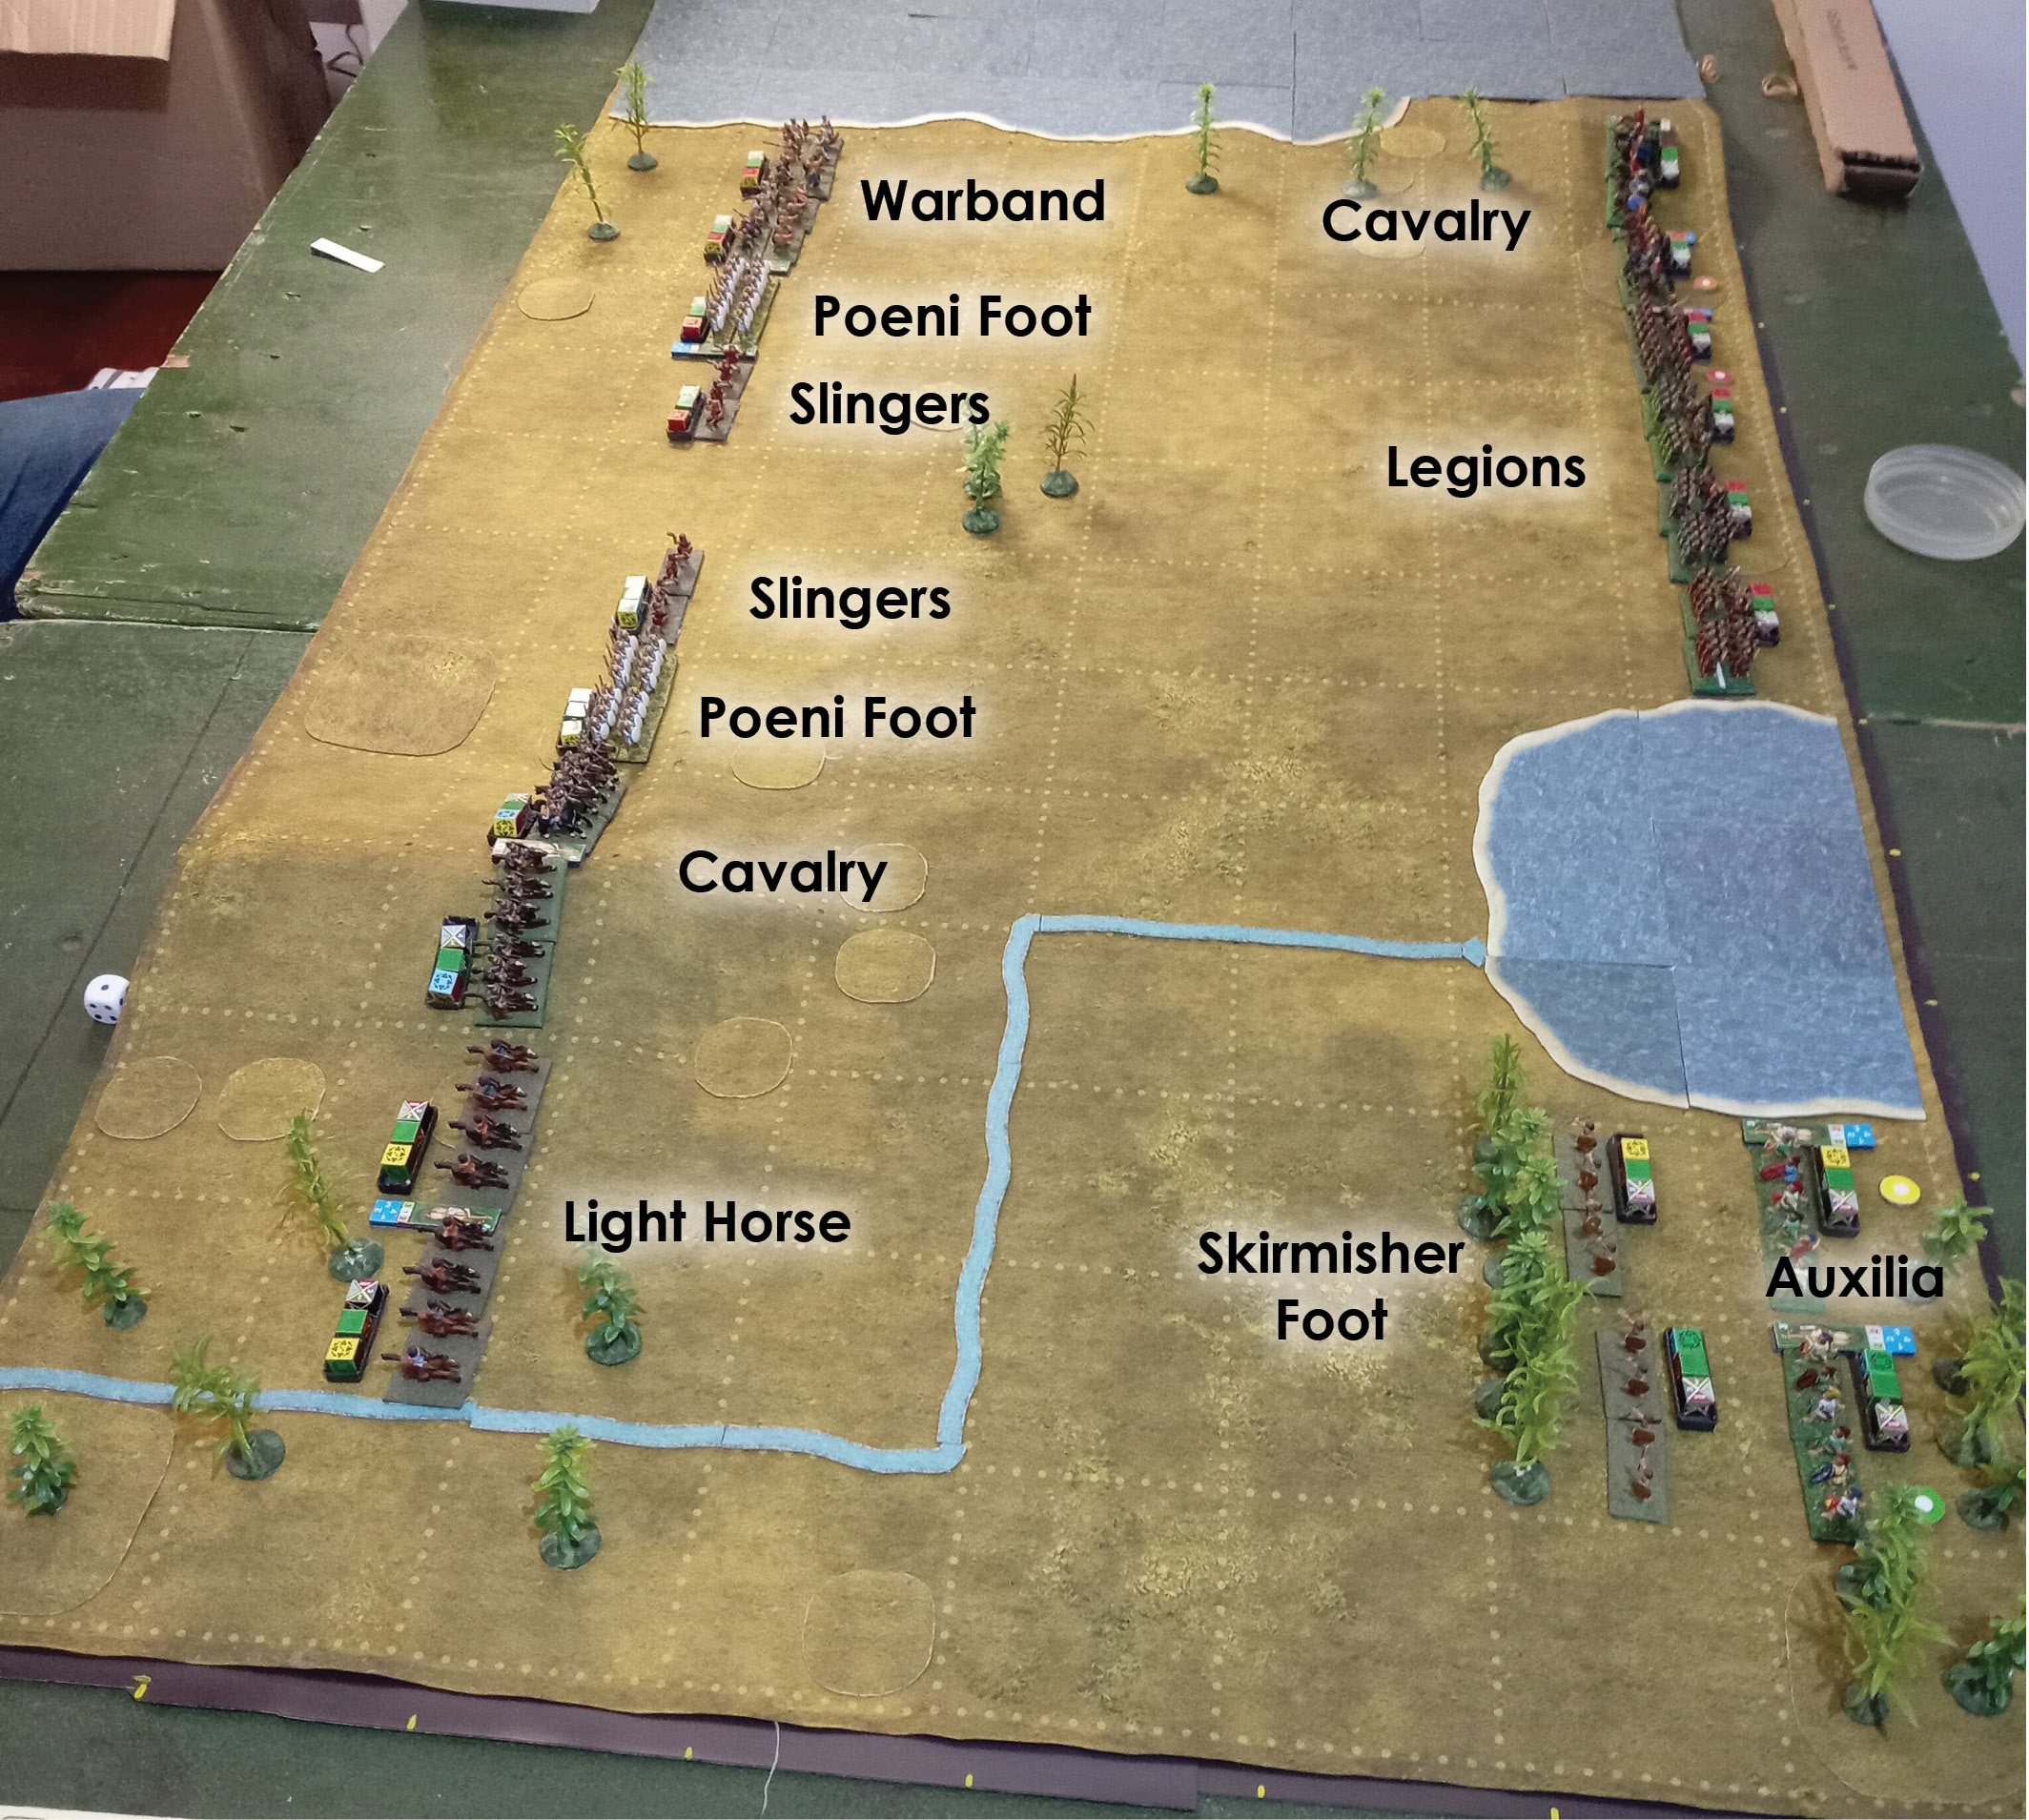
For this game I pulled out an older terrain map, fairly open country but with a nice variety of terrain features.


Peter, commanding Carthage, chose a general with a command rating of 5 whilst I, in charge of Rome, chose a general with a command rating of 1. The difference of 4 meant I had to deploy my entire army first. Not a problem since I knew that I was going to deploy in only one way regardless of what Peter did.

I packed my Legions and Cavalry between the lake and the sea, and put my Auxilia and Skirmisher Foot in the forest on the other side of the lake. Peter deployed his cavalry on his right and his infantry on his left. That suited my plans nicely.
Here is the Combat Table from the Roman vs Carthaginian ref sheet. Legions fight Poeni Foot on equal terms but have better morale thanks to line relief. Other troop types don't hit as hard, but those with missile capability of course have an advantage over those who don't.

Since I deployed first I starting moving first.
Turn 1. Rome
My plan was to keep my Auxilia and Skirmisher Foot in the forest and hopefully distract as many Carthaginian units on my left whilst my right - the Legions and Cavalry - won the battle. I needed to hold my Legions back for as long as possible so their left flank was covered by the lake. Best to start with a teasing attack by my Cavalry and see how Peter responds (reminds me somehow of the opening moves at Waterloo).

Turn 1. Carthage.
Peter responds by moving everyone forward at top speed.
Turn 2. Rome.
I'm happy by the way Peter is sending his Cavalry and Light Horse against my Skirmisher Foot and Auxilia, so decide to advance them a bit and provoke his mounted troops with a few donations of javelins. I want to keep them on that side of the battlefield.
Turn 2. Carthage.
Peter's Warband charge my Cavalry who evade. My plan for the Cavalry was to keep shooting the Warband whilst remaining out of reach until the Warband's morale was sufficiently worn down for my Cavalry to engage them directly. But I wasn't sure if my Cavalry had enough space behind them for that - I might have to advance my Legions to give the horsemen an escape hatch. But then the Legions would be obliged to keep moving forwards and I didn't want their left flank exposed to Peter's Cavalry. Decisions, decisions....

Turn 3. Rome.
Leave the Legions where they are, reform the evaded Cavalry, and let Peter come to me. Best thing to do for now.

Turn 3. Carthage.
And on they come.

Turn 4. Rome.
More waiting. Sometimes doing nothing is the best policy.

Turn 4. Carthage
The Carthaginians keep coming on, the Warband again charging the Roman Cavalry who again evade, but shooting as they do so. Are my horsemen wearing down the Warband fast enough?
Peter, realising that my Legions aren't going to be flaunting their flanks any time soon, sends his Cavalry back to his right wing to help the Light Horse against my Skirmisher Foot.

Turn 5. Rome.
Judging the time was right, I advanced the Legions. I did not want to keep them back and let the Carthaginian Slingers gradually shoot them to bits. And those Slingers covered a potential gap in Peter's line that could be exploited....
Turn 5. Carthage.
Chaaarge! My Legions could also shoot up Peter's Poeni Foot indefinitely (they can't shoot back), so he closed with them before that became a problem. My Cavalry evaded his Warband for the last time - there was no more space behind them to fall back into. They would have to stand and fight against the next charge. Were the Warband sufficiently weakened?
On the other flank my one Skirmisher Foot unit was shot to rout. First blood to Peter.

Turn 5. Melee.
Nobody routs, but one of Peter's commanders is wounded. Second blood (sort of) to me.

Turn 6. Rome.
The unengaged Legions in the centre of the Roman line charge the Slingers who have no choice but to evade. But it's not the Slingers the Legions are after....

Turn 6. Carthage.
The Warband charge the Roman Cavalry who stand against them like True Men (and mainly because they have no choice, but True Men sounds better).
Over on his right flank, Peter pulls off an elegant manoeuvre. His one LH unit shoots my Skirmisher Foot. The LH battleline then does a 180 degree about-face, pulls back a square, does another 180 degree about-face (possible for Agile class units), advances diagonally - and his other LH units shoots the Skirmisher Foot who rout under the deluge of javelins. Nicely done!
Peter's Cavalry move up to support the LH but Peter doesn't realise that he is doing exactly as I hoped. My Skirmisher Foot are sacrificial lambs, there to keep his cavalry away from my main army where the battle would be decided.

Turn 6. Melee.
My Cavalry had done enough damage with their earlier shooting. One Warband unit routs. I begin to breathe a little easier.


Turn 7. Rome.
Heavy Infantry units may turn right or left if there is enemy on their flank. The turn disorders them but sometimes that's a price you have to accept. Certainly the case here where I line up my unengaged Legions against the flanks of Peter's Poeni Foot. The Legions aren't affected by the Slingers as light foot do not exert ZOC on anything except other light foot.
The unengaged Roman Cavalry unit turns to face the flank of the surviving Warband. Things are looking good for Rome.

Turn 7. Carthage.
Peter pulls his LH back, too battered by their shootout with the Skirmisher Foot to be of much use against the Auxilia (who show no inclination to leave the forest). Meanwhile his Slingers, now out of command since their commanders' units are engaged in hand-to-hand combat, move a half-square to their rear.

Turn 7. Melee.
Nobody breaks this time.

Turn 8. Rome.
Chaaarge! The Legions and Cavalry slam home and the wounded Carthaginian commander is killed!

Turn 8. Carthage.
Peter finally realises that the fight with the Auxilia was a diversion, and moves his Cavalry double-time back towards his centre to try and redress the situation there. But are they in time to make a difference?

Turn 8. Melee.
Maybe not, as one Poeni Foot unit routs, leaving Peter's centre wide open..

The victorious Legion unit occupies the square vacated by the routed Poeni.

Turn 9. Rome.
The free Legion units turns to face the Carthaginian Cavalry.

Turn 9. Carthage.
The Carthaginian Cavalry turn from column into line, but the frontmost Cavalry unit, caught in the ZOC of the Legion unit, becomes disordered (a column turning into line in a ZOC suffers disorder as the troops scramble in confusion to face the nearby enemy).

Turn 9. Melee.
And then it's all over. The surviving Warband and Poeni Foot rout, tipping the Carthaginian army over the edge. Game over! Thanks Peter (don't feel too sorry for him as he thrashed me in a Memoir '44 game the next day).

Roma victrix!

I see what you mean about the 'feel' of that fight, it certainly worked for me. The only bit that was gamey was your cavalry being pinned up against that perennial bane of the table-top wargame, the table-edge!
ReplyDeleteTo my eternal shame I still haven't arranged a game of OPTIO at the club - must get my finger out!
The table edge is on of those insoluble problems you just live with. The cavalry could have evaded right off the tabletop and counted as routed but the plan was for them to fight as late as possible, and the plan worked. :-)
ReplyDeleteIf you want to play Optio you'll need the latest version of the ruleset plus relevant ref sheets. Email me at justinswanton [at] gmail [dot] com and I'll send them to you. Fancy an online game with Vassal?