Here is a repeat of the Rome vs Carthage scenario Peter and I had played a week before at his place. The terrain was pretty much the same but this time I added a stream from the lake to the sea. Streams give a small bonus in melee combat to the unit defending it but otherwise have no effect.
Scattered woodland slows down medium cavalry but not light horse nor any other troop type (this is how I make LH faster than MC). It confers a minor disadvantage to some units in shooting, charging and melee. In shooting especially this would have an effect on the game.
Forest is a very bad place for everything other than light foot (slingers and skirmisher archers in this case). Non LI tend to keep clear of it.
The lake and sea are of course impassable to all troop types.
Before the game each player has a certain number of command points. These enable him to choose a general and commanders, each of which has a command point rating depending on how good their command and combat rating are.
Peter, playing Carthage, chose a general with a command rating of 5. I chose a general with a rating of 1. The huge difference meant I was obliged to deploy all my army first - the idea is that the superior general guesses how the inferior general will deploy and deploys his own army accordingly.
Rome has legions who can frontally beat any other troop type. The Auxilia can go toe-to-toe with cavalry but are outfought by heavy infantry. The Roman Medium Cavalry are good, with 3 firm and 2 shaken morale intervals, but they are outnumbered 2:1 by the Carthaginian Medium and Light Cavalry, so they deploy in thin lines with only 1 stand per battlefield square.

Peter then deployed his Carthaginians. The Poeni Infantry are elite, with 3 firm and 2 shaken intervals (compared to the Legions’ 2 firm and 2 shaken intervals). The legions however can restore their morale up to top firm once in the game by line relief, in effect giving them 4 firm intervals.
These are average legions BTW. Elite legions have 3 firm and 2 shaken intervals, giving them with line relief an effective 6 firm intervals. That’s how Rome ruled the world for half a millennium.
The Celtiberian Warband are devastating in the charge but so-so in melee. Their 2 firm 2 shaken morale however becomes 3 firm and 1 shaken since they are deployed in depth with 2 ranks of stands. This makes them formidable.
Numidian LH can outshoot Roman Cavalry (who have some missile ability) but are outfought in melee combat. The Carthaginian Cavalry match the Roman Cavalry for combat ability but with a morale of 2 firm and 2 shaken intervals are slightly inferior to them.
The Balearic Slingers can shoot into the 6 squares in front of them and match the Roman Skirmisher Bow.

These are Marian Romans BTW which isn’t historical but IMHO the Marian legion functioned pretty much like the Polybian legion before it, so no matter.

Carthage is unimpressed.

My plan in this game was to delay events on the flanks whilst my legions got stuck into Peter's heavy infantry in the centre and won the battle. Peter however realised something I had not: my legions would have difficulty defeating both Warband and Poeni foot in succession. If he could win the cavalry fights on the flanks and crack a couple of my legion units he could win the battle. But could he win the cavalry fights and could he crack the legions before they cracked him? Time to find out.
Turn 1. Rome.
Since Rome deployed first it moves first. The legions and Auxilia advance in the centre whilst the Skirmisher Bow nip forwards to face the warband. My plan was to weaken them with missile fire before the Auxilia engaged them.
The Auxilia will never survive the Warband but at least they’ll keep them busy whilst my legions demolished the Poeni foot.
At the top of the battlefield the Roman Cavalry move up to close off access to the Carthaginian Cavalry.
At the bottom my other Cavalry combine two units into one. This is a manoeuvre in Optio, possible for two units of the same type and morale calibre. A unit can also split into two separate units that occupy two squares. The combined unit then hangs back, waiting to see what the Numidian LH do.

Turn 1. Carthage.
Peter was sly. He had played this scenario before and now knew what the Carthaginians were capable of.
First, his Warband moved up diagonally two squares to face my legions. His plan with them - as I realised later - was to batter the two legion units which his Poeni Infantry could then finish off. The legions could overcome the Warband but would need line relief to do it, leaving them too weak to defeat the Poeni foot.
Meanwhile his Slingers moved up to face my Skirmisher Bow. This effectively neutralised the Bow, enabling his LH to double-move in column from the bottom of the battlefield to the top without harm. Units in column can double move - from 3 squares for cavalry to 6 squares - and they can do it as close to enemy as they like.
Peter’s Carthaginian Cavalry moved up to the stream and formed line from column. They would be able to beat the Roman Cavalry deployed in a thin line. I now had a problem.
Turn 2. Rome.
I shift my Cavalry at the bottom of the battlefield to the top at top speed, forming column and double moving.
Commanders have a limited number of command points, represented by blue counters placed behind them, with their CP number set facing the commander. They may advance forwards or diagonally as much as they please, but if they turn left/right or about with their unit, they drop a CP. Once their CP allowance drops to zero the blue counter is removed and counter of their command’s colour is put in that square. Henceforth they move normally a limited number of squares from that square and then very slowly beyond that limit.
My other Cavalry units fall back, waiting for the mounted reinforcements to arrive.
The legions keep moving up - they must engage the enemy asap since they are my best units. I would prefer the Auxilia hang back but they are part of the legion command so must move with them. Units of the same command in a battleline always move with the battleline.
Slingers and Skirmisher Bow continue trading missiles.
Turn 2. Carthage.
Peter advances his LH to the flank of my Auxilia and Skirmisher Bow and forms line, then chucks javelins at them. The Bow, now getting blitzed from the front and flank, suffer heavy morale loss and rout.
The Carthaginian Cavalry move, up, only 2 squares instead of 3 since they are slowed by scattered woodland.
The Poeni Infantry hang back.
Peter has clearly decided to hammer my left flank and delay engaging my right. Smart move.
Goodbye to the Bow. Their loss does not affect the army as a whole since skirmisher foot and scythed chariots are expected to quit the battlefield fairly quickly.
A word about victory conditions. Units are classified as brittle, average or resolute. Every unit (except LI and scythed chariots) who rout inflict one panic hit on the army. The loss of a commander inflicts as many panic hits as the number in the red box on his counter. Once a number of panic hits equivalent to 1/3 of the stands (not units) in the army is incurred, all brittle units immediately rout. Once the number is equivalent to 1/2 stands all average units rout, and once the number reaches 2/3 stands the resolute units rout.
In this game the Roman Cavalry are resolute and all other Roman units average. The Carthaginian Poeni Infantry are resolute and all other Carthaginian units average.
Turn 3. Rome.
I keep moving up my legions. They must engage, fast. Legions are capable of missile combat and chuck pila at the Warband, softening them up before the Warband charge them.
The Auxilia unit next to the legions moves up with them, obliging the Skirmisher Bow to evade them (LI evade their own as well as enemy units) by passing straight through them to the rear. The other Auxilia unit cannot move up as it is ZOCed by the LH. It falls out of command and cannot move that turn.
The Roman Cavalry at the top of the battlefield combine 2 units into one and move up near the Numidian LH.
My other Roman Cavalry move to the LH flank and from line, then give them a free gift of some javelins. Roman Cavalry are capable of missile combat but are not as effective as the Numidians. But every little helps.
Just before the main clash. Notice how battered the Roman Skirmisher Bow are (one interval from routing). This is because they were shot at by both Slinger units before pulling back.
Turn 3. Carthage.
And in go the Warband. The legions manage to get some more pila in before the charge closes home, knocking a morale interval off the Warband, but they lose an interval themselves in the charge.
Meanwhile the LH turns to face the Roman cavalry, becoming severely disordered in the process. Any unit that turns when not in column becomes severely disordered.
The Carthaginan cavalry move up alongside the Roman Cavalry and one Carthaginian Cavalry unit also turns to face the Romans. It becomes disordered but it now ZOCs the Roman horse on the flank which is not a good thing for the Romans. But the disorder means it can’t score any missile hits on the Romans (too many minus modifiers).
That Auxilia unit on the other hand is getting thoroughly pummelled by the Slingers.
Turn 3. Melee.
One Roman legion and one Warband are still firm they fight a draw and both sides lose a morale interval and are now shaken.
Not sure why the other Warband unit is still firm....oh yes, it’s commander added an extra combat hit during the charge, inflicting two morale hits on the legion and dropping it to shaken which meant it lost the subsequent melee combat and the Warband’s morale remains in pristine condition.
Turn 4. Rome.
The unengaged legions continue advancing towards the Poeni Infantry. Once they reach them they will outfight them but they have to hurry.
The Auxilia charge the Slingers and oblige them to evade (LI never charge or accept a charge if they can help it).
The Roman cavalry charge the Numidian LH and rout them. Mounted vs mounted charge and melee combat is resolved twice and so is quickly resolved in favour of the side with the advantage. In this case the Numidians were disordered and the Roman commander had a better combat factor, which clinched the affair. The Roman Cavalry occupy the square vacated by the routed Numidians and now ZOC the surviving Numidian LH unit.
The other Roman Cavalry unit turns to face the Carthaginian Cavalry, becoming severely disordered in the process, but what else can it do?
The legions and Warband mix it up.
Turn 4. Carthage.
The Carthaginian cavalry form column and move to outflank the Roman horse. Meanwhile the surviving Numidian LH turns in line to face the other Roman cavalry unit, becoming disordered in the process. But at least it is able to evade a charge if necessary.
Turn 4. Melee.
Units’ morale continues to be ground down but nobody routs so we just skip straight to...

Turn 5. Rome.
The Roman Cavalry charge the Numidian LH who do what comes naturally and evade well out of reach. The Romans occupy the vacated square but decide not to go any further - there are those Carthaginian Cavalry in the rear to deal with.
Meanwhile the Auxilia move up at full speed, with the plan of flanking the Warband and helping the legions win their fight.
The unengaged legions keep advancing at full speed towards the Poeni foot. Rome’s best hopes for winning the battle are there on her right flank.
The engaged legions line relief back to full firm morale. The Celtiberian Warband don’t stand a chance now - but the legions won’t be able to repeat the trick against the Poeni Infantry.
Turn 5. Carthage.
The Carthaginian Cavalry charge and Rome does the smart thing and evades: with the second Carthaginian Cavalry on her flank hanging around would be fatal.
The Slinger units donate free lead to the Auxilia. Otherwise Carthage stays put.
Turn 5. Melee.
One of the Celtiberian Warband units finally cracks...

...and the legion unit occupies its square.

Turn 6. Rome.
The Auxilia charges the Numidian LH, but not before getting a good dose of lead poisoning. The Numidians decide to stand their ground which, with the help of their commander, they do successfully - though the commander himself is wounded.
The Roman Cavalry near the woods does a 180 degree turn and moves near the Carthaginian Cavalry. This creates a potential ZOC for the Carthaginians, protecting the other evaded Roman Cavalry unit.
Meanwhile the legions at the bottom of the battlefield finally crash home against the Poeni foot, knocking a morale interval off the lower Poeni unit thanks to their commander.
The battle is now in full swing.
Fortunes of war and all that.
Turn 6. Carthage.
The Poeni foot move up, the Slingers trade missiles with the Skirmisher Bow, but not much else happens.

Turn 6. Melee.
The Numidians break off before melee. Mounted units may break off from foot units before melee, and from mounted units after melee, the break off consisting of moving directly backwards one square without changing facing.
Turn 7. Rome.
The Roman Cavalry move up to confront the Carthaginians. Roman Cavalry have superior morale and the Roman units have a general and a commander who can boost their charge, whilst only one Carthaginians Cavalry unit has a general.
But there is bad news too...

...the Auxilia are shot to rout by the Slingers. Ouch!
Turn 7. Carthage.
The Numidians move up towards the rear of the Carthaginian Cavalry who now find themselves between a rock and a hard place.
Besides some missile exchanges not much else happens.
Turn 7. Melee.
The surviving Warband unit finally cracks.

Turn 8. Rome.
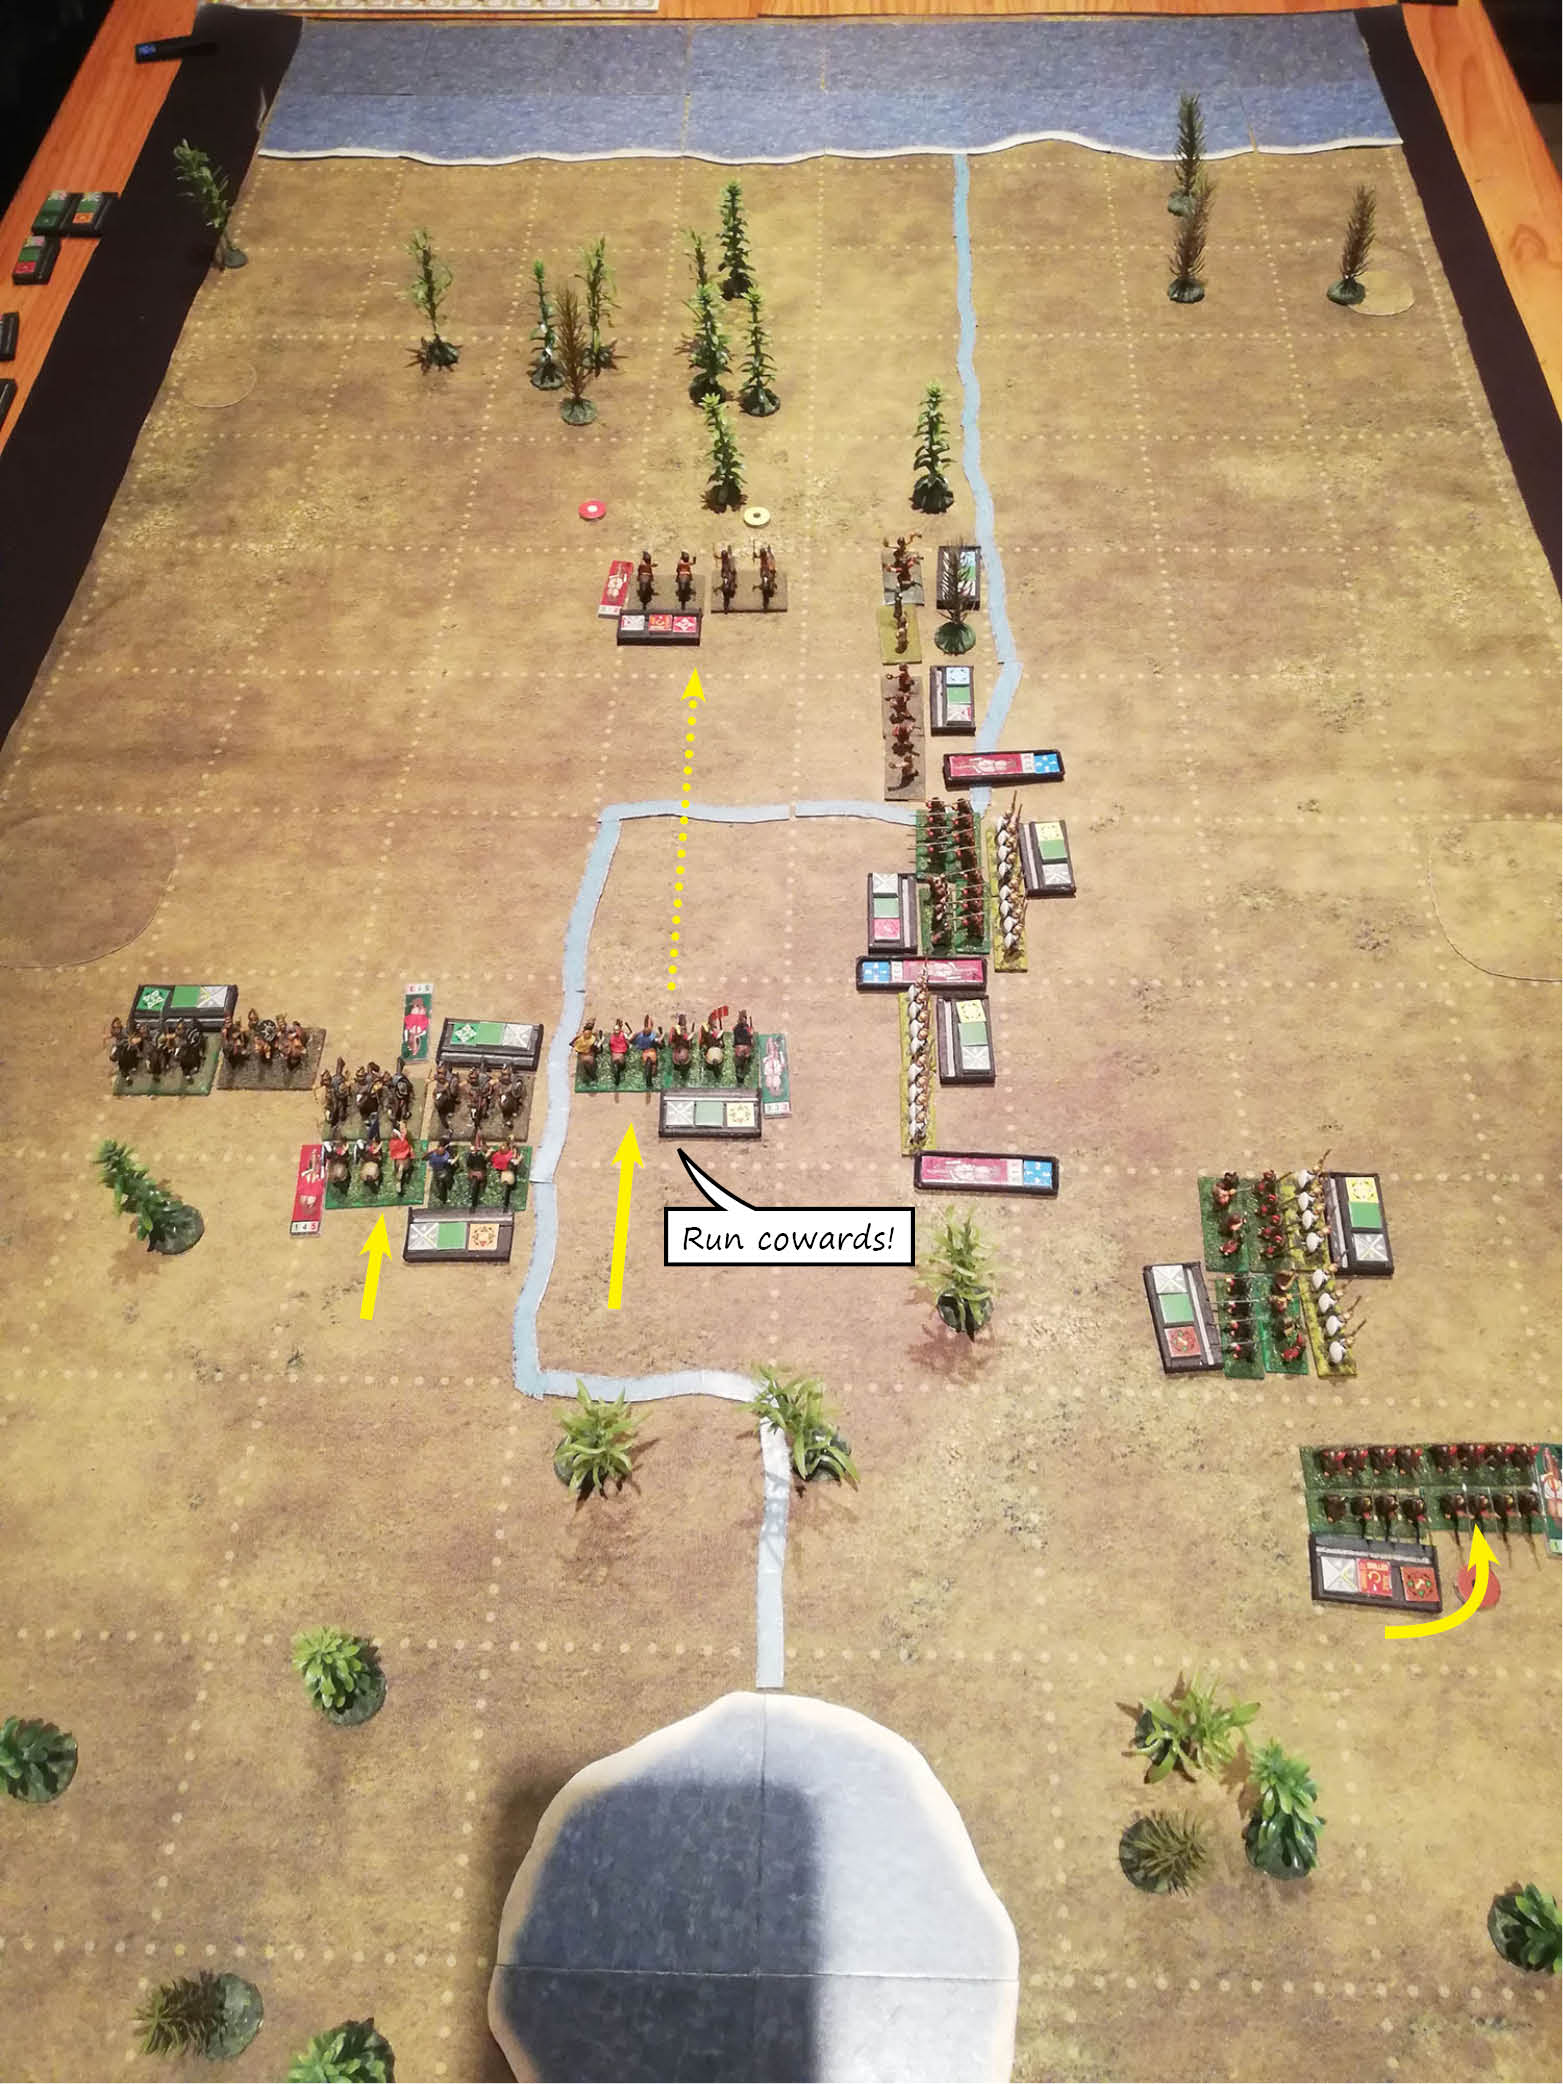
The Roman Cavalry decide time to get the hell out of there. They have finally been driven from the Roman left flank. One unit forms column and double moves as far from his out-of-command square as he can. The other unit, under the general, retires in line.

At this point Carthage (on the left) have lost 10 bases. Rome (on the right) have lost the equivalent of 5 bases (skirmisher foot don’t count). The commander counts as one base as per the number in his red box. Rome seems to be winning comfortably, but getting comfortable is never a good idea in Optio.

Turn 8. Carthage.
The Carthaginian Cavalry follow in hot pursuit whilst the Numidian LH advances cautiously, turning and incurring disorder, but no matter - the Roman horse are on the run.
More bad news for the Romans: the surviving Skirmisher Bow unit is shot to rout and quits the scene, leaving the area wide open for the victorious Slingers to advance.
In the centre the Poeni Infantry charge the exhausted legions who have already done line relief so will be outfought unless Rome comes up with something - fast.
Turn 8. Melee.
The Romans take a beating, with three legions shaken. But the rightmost Poeni Infantry unit is also battered and close to routing.

Turn 9. Rome.
The Roman Cavalry fall back and regroup, ready to protect the rear of the legions from the Carthaginians. If they can just last long enough until the Poeni foot begin to rout the battle may be settled in Rome’s favour.

Turn 9. Carthage.
The Carthaginian Cavalry and Numidian LH press the Roman Cavalry hard. If they can defeat them the battle is theirs.

Turn 9. Melee.
A legion unit routs but so does a Poeni Infantry unit.
The Poeni commander is wounded. He’ll have tales to tell his grandchildren.
This has been a ferocious battle with 4 wounded commanders so far.
Carthage (on the left) is now 2 stands from seeing her average units rout - which is most of her army, but Rome (on the right) is 3 stands from losing her average units - which is all of her legions. The battle is in the balance.
Turn 10. Rome.
Deciding that valour is the better part of valour the Roman Cavalry charge. The two opposing generals get up close and personal - and the Roman general is wounded!
The Numidians fall back from the Roman charge. But the Roman Cavalry have made a huge error here, running into the ZOC of the Poeni foot which obliges them to halt - and face a Poeni charge in Carthage’s move. Damn!
Meanwhile the unengaged legion turns to face the Poeni foot in the flank, ready to charge them the next turn. This disorders them but they have no time to waste.
Turn 10. Carthage.
The Poeni charge the Roman cavalry in the flank, severely disordering them, after which the Romans turn to face them.
The unengaged Carthaginian horse move to the Roman Cavalry’s flank. Since they had to turn they cannot charge them this turn (the only movement allowed during a charge is a diagonal advance or an advance straight ahead).
Turn 10. Melee.
Things get worse for Rome as the Roman Cavalry cannot break off from the Poeni foot since the square behind them is occupied. The are obliged to melee the Poeni and suffer severe morale loss.
Nobody however routs this turn.
General vs general. This happens in so many games I’m beginning to wonder if Peter isn’t telling me something....
Turn 11. Rome.
Mounted units may break off from mounted units after melee unless contacted on their flank or rear. I make use of this rule to pull back from the Carthaginian horse before I get flank charged (and I need to get away from those javelins).
Meawhile my free legion finally charges the Poeni in the flank, severely disordering them. There is no resolution of combat from a flank charge, unlike a rear charge that disorders the charged unit after which charge combat is resolved.
Those Poeni are now close to routing. The next melee will finish them off. Rome will win!
Turn 11. Carthage.
And then it’s all over. One Carthaginian Cavalry unit advances, clearing the way for the other which charges the Roman Cavalry in the rear, instantly routing them.

O tempora, O mores! With the two cavalry stands gone and the commander with them (he has no other unit of his command to run to so he counts as lost) Rome’s threshold for average units is reached and all the legions (average class) rout. That leaves the surviving Roman Cavalry unit (resolute class) on the battlefield, but with more than 3/4 of the army gone, it too breaks. Game over!

Well, Peter's plan worked. Besides throwing away one of my cavalry units, I had misused my Auxilia, allowing them to advance and get shot to pieces by Peter's deadly Slingers. Peter for his part lost a Numidian LH unit for no good reason but nobody's perfect, and no-one will be mentioning it at the victory parade in Carthage.
A revenge game with the same scenario takes place tomorrow. This time I have a cunning plan...