Sunday, June 23, 2024

Amphipolis again with a new opponent

Phil Sabin kindly offered to try out Optio online using its VASSAL module. Naturally I accepted. As an aside, I've always been a fan of Legion, IMHO the best dice and hex Ancients wargame out there, as it is not complex and produces very historical results. You can get it here with a write-up on Boardgamegeek here.

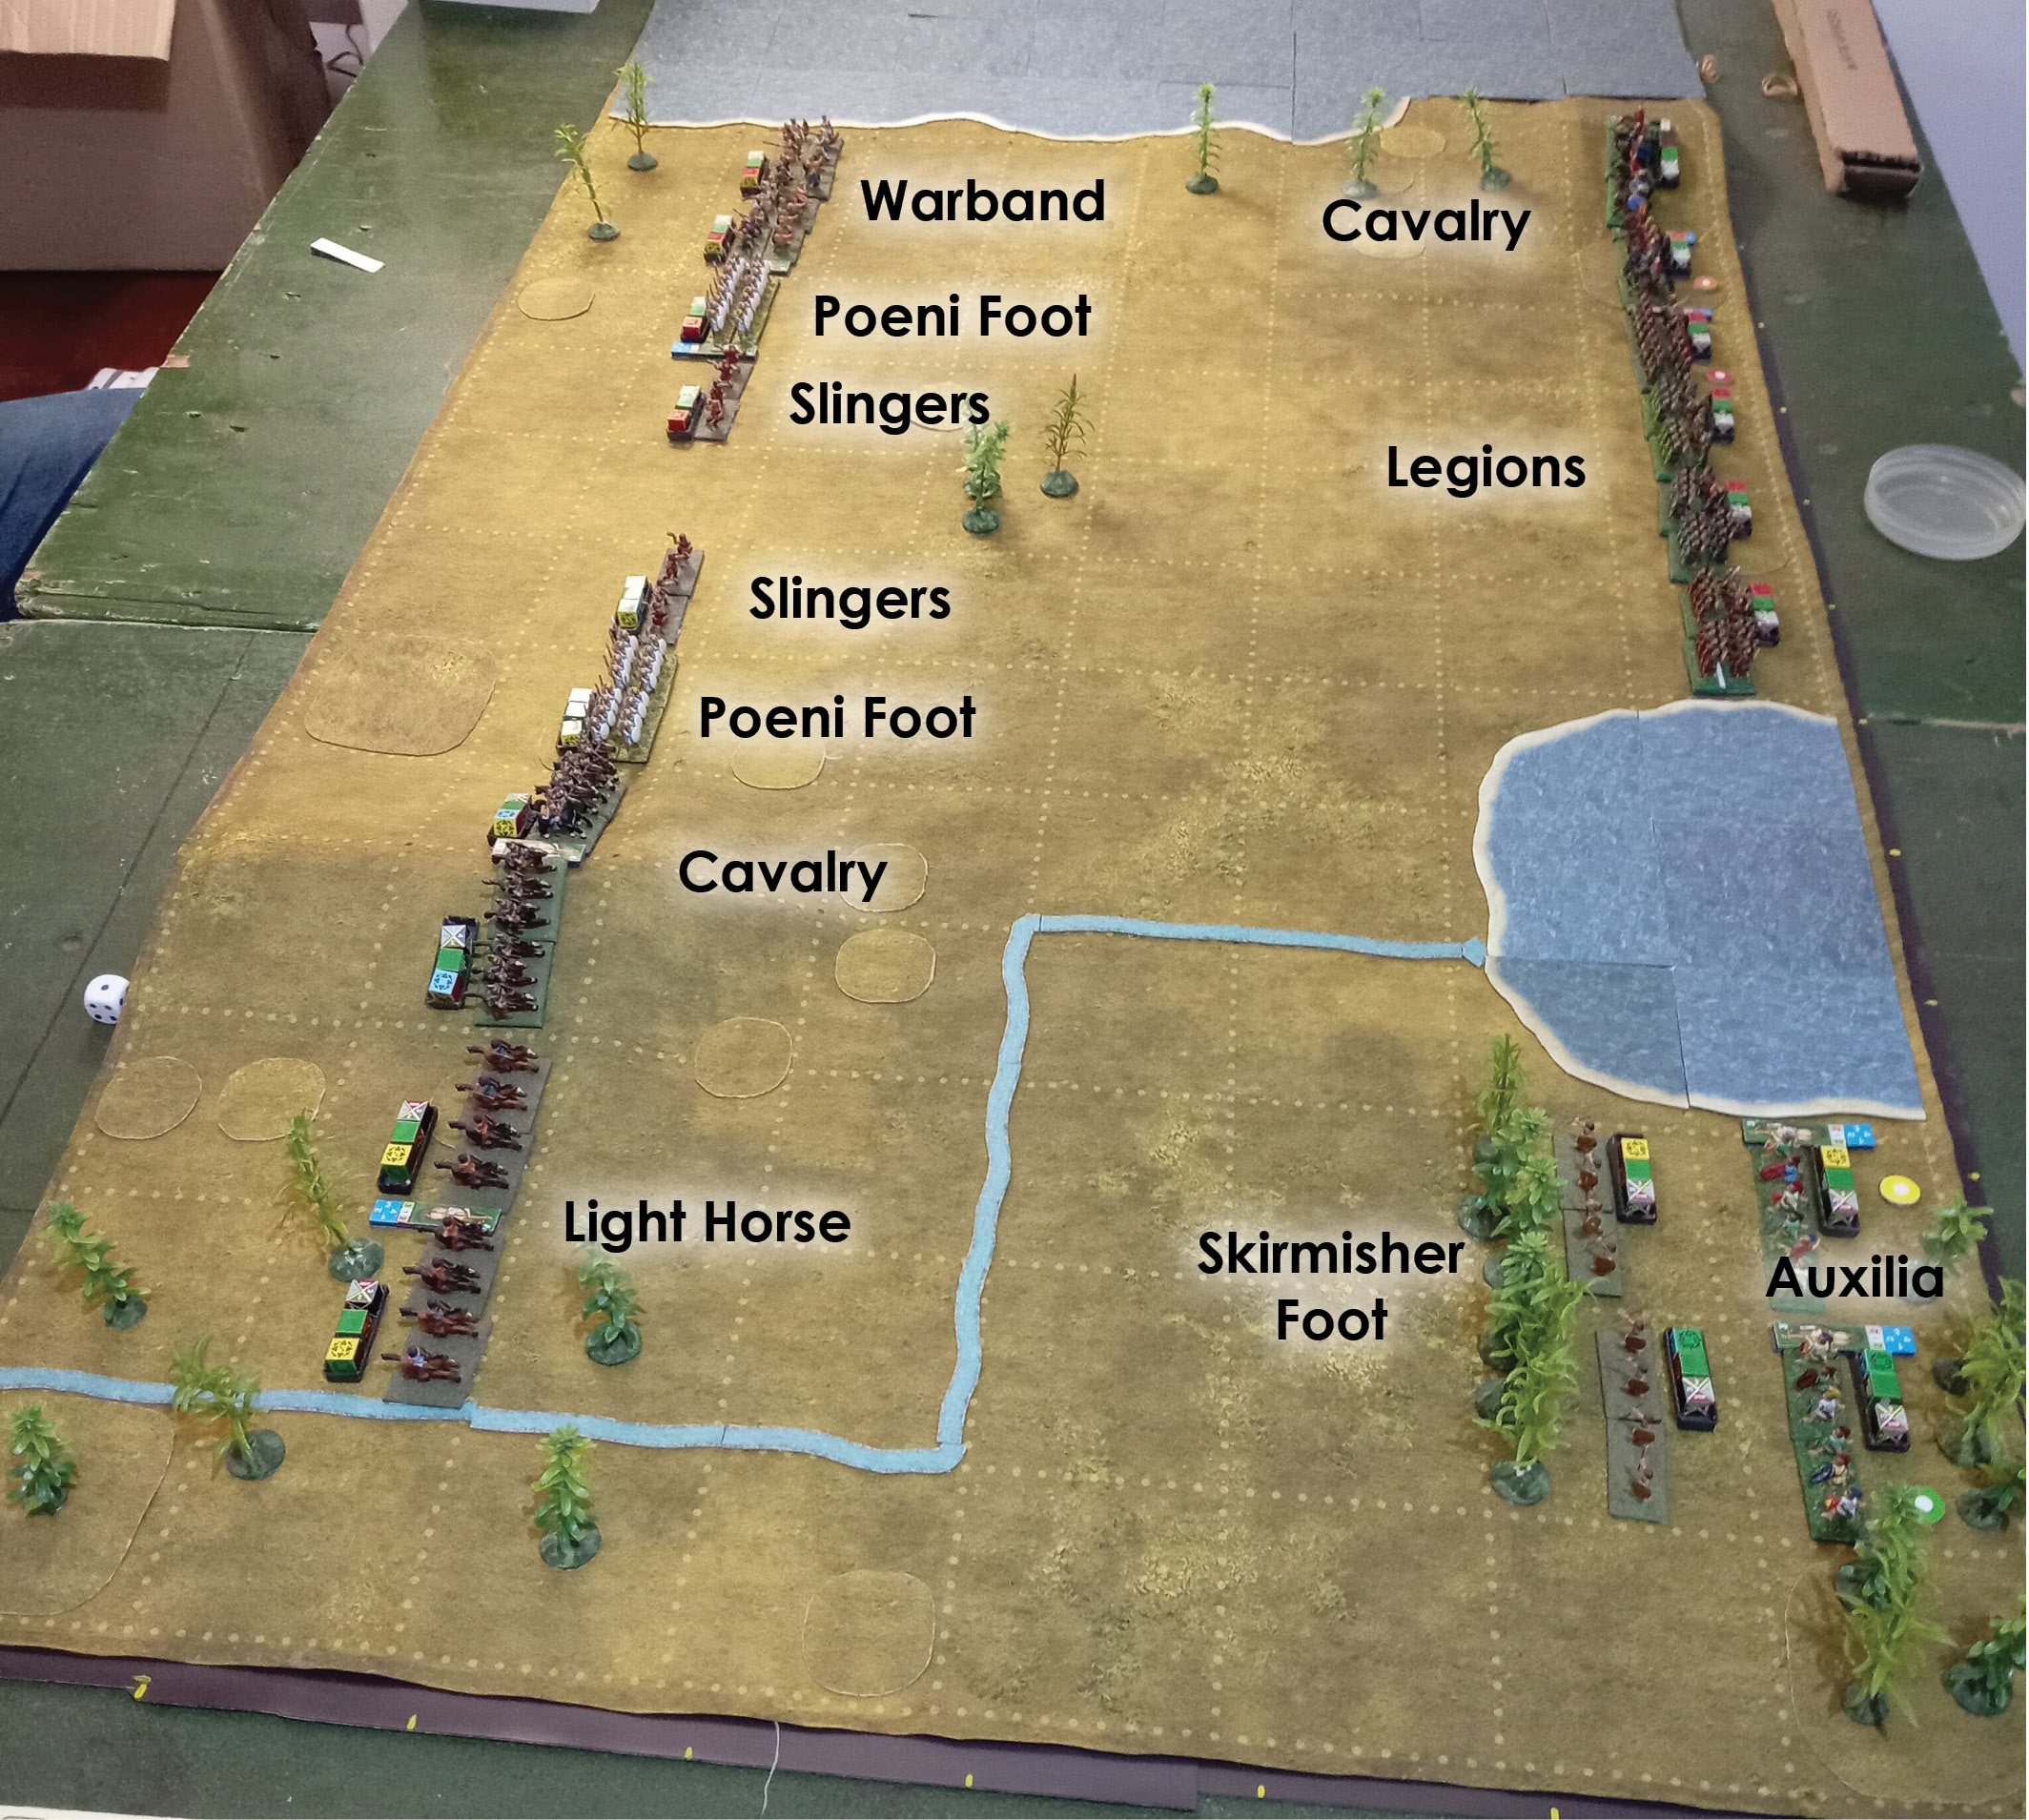
For this game Phil took the Spartans at the bottom and Yours Truly the Athenians at the top. We both deployed thus:

Turn 1. Athens.

I had started deployment so moved first, sending my Hoplites and Cavalry up to the stream. A good position to wait and see what Sparta would do.

Turn 1. Sparta.

Phil moved everyone up except his uncommanded Peltast unit on the right (uncommanded because not part of a battleline with its commander).

Turn 2. Athens.

I decided better to send my general over to the other flank to cover against Phil's cavalry. By the way,  my hoplites had thus far moved under the control of the general since they started the game adjacent to his command, but from now on they would move under orders - which meant I should have put an orders counter in their square, but forgot. I put it there in the following turn.

Turn 2. Sparta.

Phil moves his infantry up to the stream whilst his cavalry cross it. His uncommanded Peltast unit on the right may move only half a square per turn: up to the square edge on turn 1, into the square in turn 2, up to the square edge in turn 3, and so on.

Turn 3. Athens.

I move my Cavalry alongside my Archers. My position is good - I have the hill and stream bonus - but my Archers cannot fight Peltasts and will evade if charged by them or anyone for that matter. That is a weakness Phil can exploit.

Turn 3. Sparta.

Phil spends a command point to stop his Cavalry. When under orders, a unit - once it has started moving - must advance at least one square per turn unless it spends a command point to stop or change direction. Commanders have only so many command points, and once these are used up he is limited in how many squares he can freely move from the square his last command point took him to.

Once stopped, a commander may wait as many turns as the player likes before moving again.

The uncommanded Peltast unit on the right keeps inching forwards.

Turn 4. Athens.

Time to get stuck in! My Athenian Hoplites are better than the mercenary Hoplites Sparta is using, and my plan on my right flank is to shoot Phil's Cavalry into impotence with my Cavalry and Archers and then deal with his Peltasts.

Turn 4. Sparta.

Under a barrage of arrows and javelins, the Spartan Cavalry pull back. The rest of the infantry stay put whilst that uncommanded Peltast unit keeps creeping forwards. Phil's plan is to use it to turn my flank.

Turn 5. Athens.

Chaaarge! The Athenian Hoplites close with their Spartan counterparts for a strictly drawn fight hence no effect. Neither side's commander is wounded, yet.

Meanwhile the Athenian Cavalry move up and shoot the Spartan Cavalry to rout. Those archers did their job. Phil has lost 2 cavalry stands and their commander (which has no friendly unit of his command to flee to). 1 loss point for each cavalry stand and 2 loss points for the commander (a commander is worth half the loss points of a general, so the number in the red box is halved).

Turn 5. Sparta.

Those Peltasts keep plodding on....

Turn 5. Melee.

Drawn fights, so everyone drops a morale interval (unlike charge combat where drawn fights have no effect). The commanders involved in the melee are thus far unscathed.

Turn 6. Athens.

I'm uneasy about that Peltast unit on my left flank so decide to send the general to deal with it.

Turn 6. Sparta.

Phil's Peltasts charge my Archers and Peltasts, both of whom evade. 

Turn 6. Melee.

Another drawn fight, but now the Spartan Hoplites drop to shaken whilst the better-quality Athenians remain firm. But bad news for the Athenians: their commander throws a double six and is killed! The Spartan commander is only wounded on a single six. He'll have stories to tell his grandchildren....

Turn 7.  Athens.

I send in the Cavalry to keep that Peltast unit busy.

Turn 7. Sparta.

And in go Phil's Peltasts. The leftmost unit forces my Archers to evade right off the battlefield and they count as routed. My own Peltasts on the right naturally don't evade as they would count as lost as well. They stand their ground for a drawn fight.

Turn 7. Melee.

Even though Phil's Hoplites are shaken and mine are firm, melee combat is still drawn. My leftmost Hoplite unit had charged over a stream hence Phil's Hoplites, defending the stream, get a high white modifier, converting their highest shaken interval to firm. On the right, Phil's commander also gives a high white modifier and that unit also fights as firm. In consequence everyone loses a morale interval.

The problem now is that Phil's Hoplites are on their lowest morale interval and nothing can prevent them from routing in the next melee, which would send his entire army packing. So we decided to call it a day.

Phil liked some aspects of Optio but not others. He gave me some valuable input, for example that skirmisher foot should outshoot light horse since the latter have fewer riders than the skirmishers. Duly amended. And thanks again for the game. 🙂

Monday, June 17, 2024

Rome vs Carthage - with a difference

Rome vs Carthage yet again - but this time with a difference. Following an interesting thread on TMP, I tweaked the Command and Control rules, making the following two changes:

  1. Battlelines of other commands that are directly in front of, behind, or alongside the general's battleline can be moved as an extension of the general's battleline, i.e. the general can freely move the block of battlelines as a single entity.

  2. Commanders moving independently of the general follow normal rules but once they started moving they are obliged to move at least one square per turn, spending a command point to either stop or change direction.

For this game I pulled out an older terrain map, fairly open country but with a nice variety of terrain features.

In the terrain pre-game our army blocks ended up in this part of the map, with a coastline (edge of the board), lake, stream, forest, scrub and a couple of hills.

Which we then recreated on the table.

Peter, commanding Carthage, chose a general with a command rating of 5 whilst I, in charge of Rome, chose a general with a command rating of 1. The difference of 4 meant I had to deploy my entire army first. Not a problem since I knew that I was going to deploy in only one way regardless of what Peter did.

I packed my Legions and Cavalry between the lake and the sea, and put my Auxilia and Skirmisher Foot in the forest on the other side of the lake. Peter deployed his cavalry on his right and his infantry on his left. That suited my plans nicely.

Here is the Combat Table from the Roman vs Carthaginian ref sheet. Legions fight Poeni Foot on equal terms but have better morale thanks to line relief. Other troop types don't hit as hard, but those with missile capability of course have an advantage over those who don't.

Since I deployed first I starting moving first.

Turn 1. Rome

My plan was to keep my Auxilia and Skirmisher Foot in the forest and hopefully distract as many Carthaginian units on my left whilst my right - the Legions and Cavalry - won the battle. I needed to hold my Legions back for as long as possible so their left flank was covered by the lake. Best to start with a teasing attack by my Cavalry and see how Peter responds (reminds me somehow of the opening moves at Waterloo).

Turn 1. Carthage.

Peter responds by moving everyone forward at top speed.

Turn 2. Rome.

I'm happy by the way Peter is sending his Cavalry and Light Horse against my Skirmisher Foot and Auxilia, so decide to advance them a bit and provoke his mounted troops with a few donations of javelins. I want to keep them on that side of the battlefield.

Turn 2. Carthage.

Peter's Warband charge my Cavalry who evade. My plan for the Cavalry was to keep shooting the Warband whilst remaining out of reach until the Warband's morale was sufficiently worn down for my Cavalry to engage them directly. But I wasn't sure if my Cavalry had enough space behind them for that - I might have to advance my Legions to give the horsemen an escape hatch. But then the Legions would be obliged to keep moving forwards and I didn't want their left flank exposed to Peter's Cavalry. Decisions, decisions....

Turn 3. Rome.

Leave the Legions where they are, reform the evaded Cavalry, and let Peter come to me. Best thing to do for now.

Turn 3. Carthage.

And on they come.

Turn 4. Rome.

More waiting. Sometimes doing nothing is the best policy.

Turn 4. Carthage

The Carthaginians keep coming on, the Warband again charging the Roman Cavalry who again evade, but shooting as they do so. Are my horsemen wearing down the Warband fast enough?

Peter, realising that my Legions aren't going to be flaunting their flanks any time soon, sends his Cavalry back to his right wing to help the Light Horse against my Skirmisher Foot.

Turn 5. Rome.

Judging the time was right, I advanced the Legions. I did not want to keep them back and let the Carthaginian Slingers gradually shoot them to bits. And those Slingers covered a potential gap in Peter's line that could be exploited....

Turn 5. Carthage.

Chaaarge! My Legions could also shoot up Peter's Poeni Foot indefinitely (they can't shoot back), so he closed with them before that became a problem. My Cavalry evaded his Warband for the last time - there was no more space behind them to fall back into. They would have to stand and fight against the next charge. Were the Warband sufficiently weakened?

On the other flank my one Skirmisher Foot unit was shot to rout. First blood to Peter.

Turn 5. Melee.

Nobody routs, but one of Peter's commanders is wounded. Second blood (sort of) to me.

Turn 6. Rome.

The unengaged Legions in the centre of the Roman line charge the Slingers who have no choice but to evade. But it's not the Slingers the Legions are after....

Turn 6. Carthage.

The Warband charge the Roman Cavalry who stand against them like True Men (and mainly because they have no choice, but True Men sounds better).

Over on his right flank, Peter pulls off an elegant manoeuvre. His one LH unit shoots my Skirmisher Foot. The LH battleline then does a 180 degree about-face, pulls back a square, does another 180 degree about-face (possible for Agile class units), advances diagonally - and his other LH units shoots the Skirmisher Foot who rout under the deluge of javelins. Nicely done!

Peter's Cavalry move up to support the LH but Peter doesn't realise that he is doing exactly as I hoped. My Skirmisher Foot are sacrificial lambs, there to keep his cavalry away from my main army where the battle would be decided.

Turn 6. Melee.

My Cavalry had done enough damage with their earlier shooting. One Warband unit routs. I begin to breathe a little easier.

The Roman Cavalry unit occupies the square vacated by the routed Warband.

Turn 7. Rome.

Heavy Infantry units may turn right or left if there is enemy on their flank. The turn disorders them but sometimes that's a price you have to accept. Certainly the case here where I line up my unengaged Legions against the flanks of Peter's Poeni Foot. The Legions aren't affected by the Slingers as light foot do not exert ZOC on anything except other light foot.

The unengaged Roman Cavalry unit turns to face the flank of the surviving Warband. Things are looking good for Rome.

Turn 7. Carthage.

Peter pulls his LH back, too battered by their shootout with the Skirmisher Foot to be of much use against the Auxilia (who show no inclination to leave the forest). Meanwhile his Slingers, now out of command since their commanders' units are engaged in hand-to-hand combat, move a half-square to their rear.

Turn 7. Melee.

Nobody breaks this time.

Turn 8. Rome.

Chaaarge! The Legions and Cavalry slam home and the wounded Carthaginian commander is killed!

Turn 8. Carthage.

Peter finally realises that the fight with the Auxilia was a diversion, and moves his Cavalry double-time back towards his centre to try and redress the situation there. But are they in time to make a difference?

Turn 8. Melee.

Maybe not, as one Poeni Foot unit routs, leaving Peter's centre wide open..

The victorious Legion unit occupies the square vacated by the routed Poeni.

Turn 9. Rome.

The free Legion units turns to face the Carthaginian Cavalry.

Turn 9. Carthage.

The Carthaginian Cavalry turn from column into line, but the frontmost Cavalry unit, caught in the ZOC of the Legion unit, becomes disordered (a column turning into line in a ZOC suffers disorder as the troops scramble in confusion to face the nearby enemy).

Turn 9. Melee.

And then it's all over. The surviving Warband and Poeni Foot rout, tipping the Carthaginian army over the edge. Game over! Thanks Peter (don't feel too sorry for him as he thrashed me in a Memoir '44 game the next day).

Roma victrix!