Wednesday, December 25, 2024

Pre-game terrain maps

 The Optio pre-game is a way of choosing terrain that corresponds more to reality - generals marching and countermarching until they found a bit of ground they were happy to fight on. This is a way of turning those complicated and arbitrary rules for dicing for terrain into an operational game in which players try to manoeuvre their opponents onto terrain that favours them. The game usually lasts about 5 minutes and is not complicated.

In the pre-game a player's army is represented by a block with another block as a scout and two blocks as dummies. I'll do a post on it some time. Just a quickie for now (Christmas Day and all that).

Here are a few examples of terrain maps. A big square is a battlefield (with perhaps some columns of small squares on either side. Once two army counters enter the same big square that becomes the battlefield, with the terrain orientated in the direction the second army entered the square.

Very open terrain


Open terrain


Average terrain


I'm working on mountainous terrain, wooded terrain and cultivated terrain. That should be enough. Maybe also desert terrain come to think of it.

Saturday, December 21, 2024

Yes they can!

After the previous Frankish debacle I tried a different deployment and this time it worked.

The idea was to pack the big punch in the first line, using units in depth and elite Household Warriors against the Legions but keeping the original disposition against the Bucellarii - it had worked against them last time and I wanted to lose as few Warriors as possible when the first line routed in order not to tip the entire army over the edge.

Deployment.


Turn 1. Clovis.

The cavalry stay where they are for this game as the idea is to see how the infantry do. The two lines of Warriors advance.


Turn 1. Syagrius.

The Roman infantry advances to maximise its hill advantage (both Bucellarii units are now upslope). 


Turn 2. Clovis.

The Warriors keep moving. They feel good about things this time.


Turn 2. Syagrius.

Romans stay put. Those stupid Franks want another taste of it - let them come!


Turn 3. Clovis.

The Franks are now in missile range and everything flies.


Turn 3. Syagrius.

The missile barrage continues.


Turn 4. Clovis.

The first line charges. The Warriors in the centre have already lost some morale thanks to the Legions' missile barrage, but all Warriors win the charge combat, knocking off a morale interval of the Romans.


Turn 4. Syagrius.

Not much for the Romans to do other than fight it out.


Turn 4. Melee.

Which they do. No routs yet.


Turn 5. Clovis.

The Roman Archers have two minus modifiers - one for being in a thin line (one stand per square) and one for shooting at troops in hand-to-hand combat. This means they can shoot only during the Franks' move, i.e. once a turn instead of the usual twice.


Turn 5. Syagrius.

No much happens.


Turn 5. Melee.

The Frankish first line is becoming fragile.


Turn 6. Clovis.

The Franks hammer on, taking some hits from the Roman Archers.


Turn 6. Syagrius.

Not much to say.


Turn 6. Melee.

And the Frankish first line routs except the Household Warriors. Roman morale is boosted....


....and the victorious Romans occupy the vacated squares. This has for effect to put the supporting Archers out of range.


Turn 7. Clovis.

The Frankish second line charges after taking some missile hits. Despite morale boosts from the rout of the previous Frankish line, the Roman infantry are weakened. The battle is beginning to take its toll.


Turn 7. Syagrius.

The Archers - uncommanded hence slow - creep forwards  to support the HI again, as do the Levy.


Turn 7. Melee.

The Romans become shaken. Not looking good for them.


Turn 8. Clovis.

The battle rages on.


Turn 8. Syagrius.

The Archers are finally in range but can't shoot yet - only during the Franks' turn.


Turn 8. Melee.

The Legion on the Roman left routs whilst the rest of the line is close to breaking.


Nearby Franks get a morale boost from the routed Legionaries....


....and occupy their vacated square.


Turn 9. Clovis.

The Household Warriors charge the Garrison Troops, knocking down their morale.


Turn 9. Syagrius.

The Romans pray for a miracle.


Turn 9. Melee.

....which does not come. The Roman line routs.


The nearby Frankish units get morale boosts from the routed Romans....


....and occupy their squares.


And that's it. The Romans have lost enough stands for their brittle and average units to automatically rout. Their entire army decamps. Game over!


Moral of the story is that the movement and combat determinism of Optio does not mean that the outcome of a game is pre-determined, no matter how well you know the armies. Superlative system, what can I say? 😎

Can the Franks beat the Romans?

After Anthony's comment on the last Clovis vs Syagrius game on how the Franks just can't seem to win, even in the hands of an experienced player, I decided to try a test game with my Vassal module, a frontal infantry clash in which the Franks form up in two lines and take the Romans head on.

I wanted the cavalry of both sides to do their best to make a difference, but in fact it devolved into a Mexican standoff whilst the infantry decided the battle.

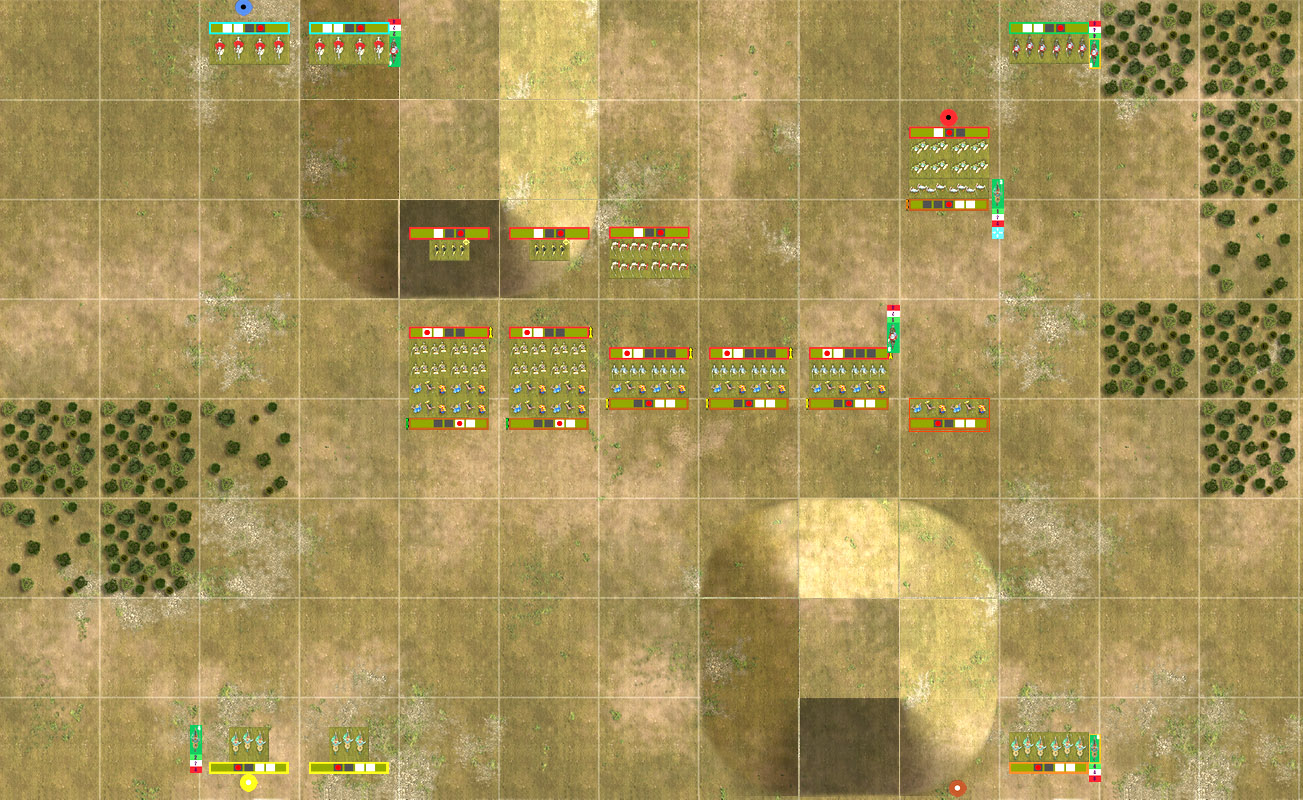
Same terrain as the previous game. 

Deployment.

Syagrius maximises use of terrain, putting the weaker Bucellarii on the hill and supporting them with archers whilst the elite Legions deploy on the plain. The vulnerable Levy and Garrison Troops in reserve.

Clovis deploys his Warriors in two lines, the first to weaken the Roman infantry and the second to finish them off. He deploys half his cavalry in a thin line - one stand per square - to match the frontage of the Breton LH. The job of the cavalry will be to survive long enough to keep the Roman horse away from the Warriors. Let's see how it works.

Turn 1. Syagrius.

Since both generals are equal in command ability dice are thrown (!!!) to decide who goes first. Syagrius gets the high throw and advances, the idea being to take full advantage of the hill's upslope.


Turn 1. Clovis.

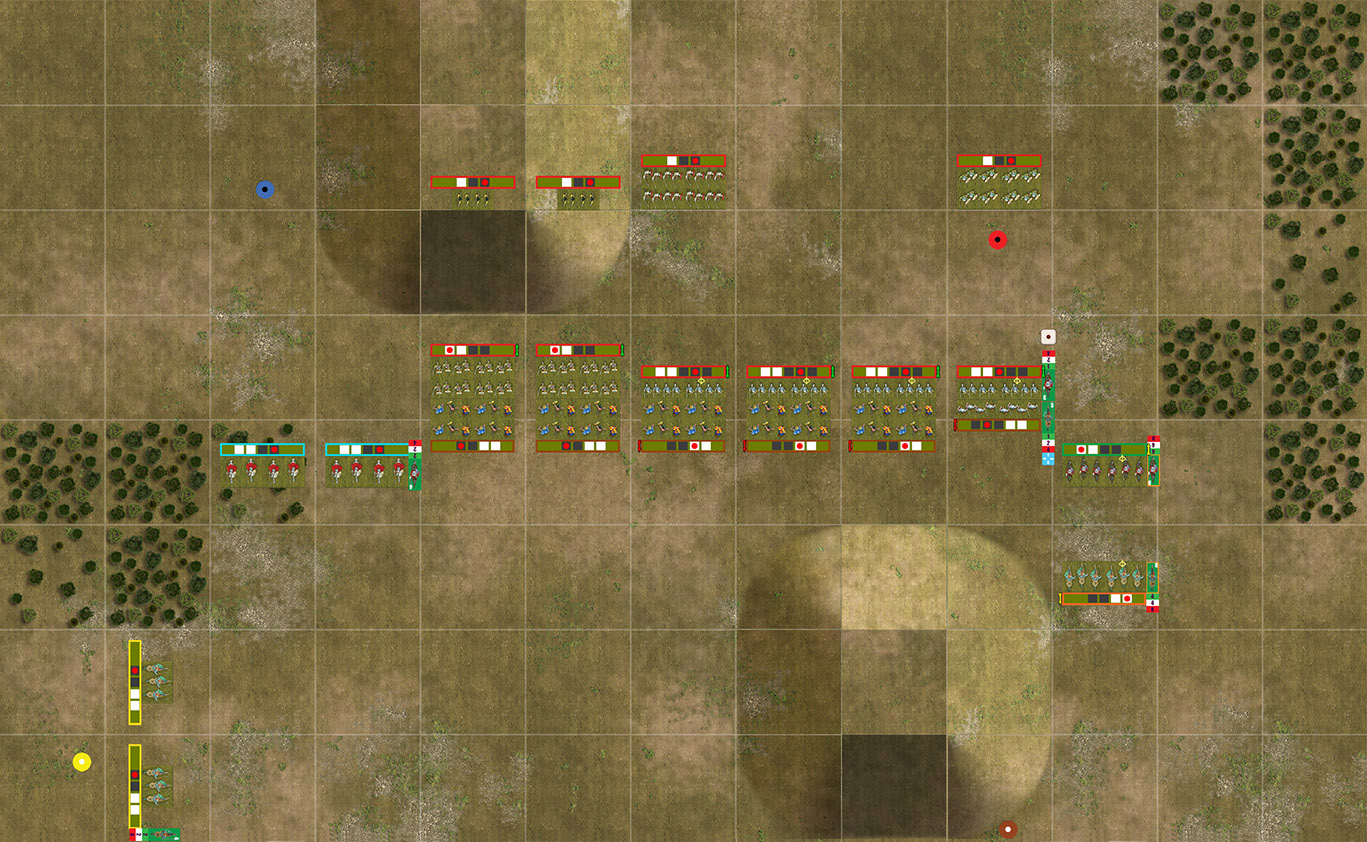
Clovis' MC on the left move behind the woods where the Breton LH will have trouble engaging them. The Warriors advance.


Turn 2. Syagrius.

Syagrius halts the infantry (a command point to do so) and moves up his LH. He wants to come to grips with the Frankish MC if possible.


Turn 2. Clovis.

The Frankish MC form line, ready for the Breton LH. The Warriors keep advancing.


Turn 3. Syagrius.

Syagrius pulls the LH back since they are at an impasse where they are.


Turn 3. Clovis.

The Warriors approach the Romans and franciscas, javelins, plumbata and arrows start to fly. The Romans are strong in missile combat.


Turn 4. Syagrius.

The Romans hold their ground and keep shooting.


Turn 4. Clovis.

Franke verhef! In go the Warriors, but they have had some morale chipped off thanks to the effective Roman shooting.


Turn 4. Melee.

The Warriors facing the Legions are taking a beating but are doing better against the Bucellarii.


Turn 5. Syagrius.

Syagrius advances his cavalry. He must try something on the wings.


Turn 5. Clovis.

The Frankish cavalry on the left continue to play coy.


Turn 5. Melee.

Nobody routs yet, but the Franks are in serious trouble. The Bucellarii get a double +1 modifier for their shaken morale intervals: one from being upslope and one for being in depth. 


Turn 6. Syagrius.

Syagrius charges Clovis and gets up close and personal with the Frankish king.


Turn 6. Clovis.

The MC on the left shake out a line.


Turn 6. Melee.

The Frankish first line routs, giving morale boosts to the Romans (2 morale intervals max).


The Romans occupy the vacated squares


Turn 7. Syagrius.

Shooting all round whilst the Roman reserves - out of command - creep forwards ½ square per turn.


Turn 7. Clovis.

The missile exchange continues.


Turn 7. Melee.

Clovis and Syagrius fight to exhaustion and break off.


Turn 8. Syagrius.

The Romans keep up the shooting, waiting for the Franks to come to them.


Turn 8. Clovis.

And the Franks oblige. For Odin!


Turn 8. Melee.

The Bucellarii finally rout, but the Warriors in the centre are looking fragile.


Nearby Warriors get a morale boost from the routed Bucellarii.


And the victorious Warriors occupy the vacated squares.


Turn 9. Syagrius.

The Levy move up.


Turn 9. Clovis.

The Warriors inch forwards towards the Archers who continue to pound them.


Turn 9. Melee.

The Franks in the centre rout....


....giving morale boosts to the nearby Romans....


....and fleeing the battlefields squares for them to occupy.


Enough stands have been lost to tip average units - the Frankish cavalry - over their panic threshold and they rout.


Clovis makes it to his nearby Household Warriors.


But the loss of the cavalry units means the losses now reach the threshold of the resolute Warrior units and they break in turn. Game over!


Moral of the story: if the Franks attack the Romans frontally when the latter are in a good position, they will lose. They need to tip the odds in their favour somehow. Is that historical? Syagrius was confident about engaging Clovis after all.