Rome vs Carthage again. I know, I promised different armies this time. Promise promise for next time....
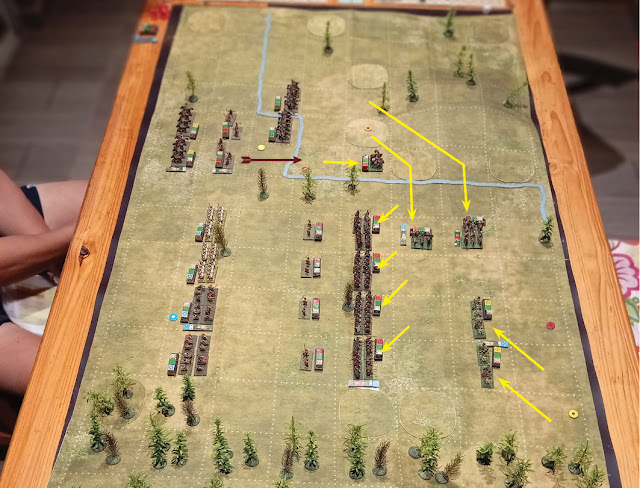
We tried a new terrain map for the pre-game - heavily forested countryside which supplied good anchors for flanks.
The battlefield template was centered over the square in which the two armies had collided....
....and then moved one small square sideways and up by the defender (the player whose army occupied that big battlefield square first, Peter in this case).
Then time for deployment. Carthage (Peter) on the left, Rome (yours truly) on the right. I had hoped for this kind of terrain: the forest shortened the width of the battlefield, making it easier for me to counter Peter's superior cavalry.
Turn 1. Rome.
I had deployed first so moved first. My plan was pretty simple: Advance the legions at top speed to engage Peter's Poeni foot and Warband, whilst my Auxilia hung back as a flank guard to be committed as late as possible and my cavalry delayed Peter's mounted units for as long as possible. But you know what Moltke said about plans....
Turn 1. Carthage.
Peter moves his Slingers up and starts shooting my cavalry. His Slinger are Balearic, elite and so with superior range (3 squares instead of the usual 2). His LH also start advancing, but let the Slingers soften me up first before the LH and MC engage.
Turn 2. Rome.
I decide that sitting there and getting shot up by the Slingers is for the birds, and so charge them, obliging them to evade through their own LH. My General's MC unit moves up in support and my Legions keep ploughing ahead. Nothing must be allowed to stop them.
Turn 2. Carthage.
Peter pulls his LH back through the Slingers and charges in with his MC. My own MC is in a thin line, not a problem for the charge, but it will be at a disadvantage in the ensuing melee. After weighing things up, I decide not to evade but to receive the charge.
Turn 2. Melee.
My MC take a beating as expected....
....and break off after melee is done. Mounted units can break off from mounted units in this fashion directly after melee. They can break off from foot units directly after charging, i.e. before melee.
Turn 3. Rome.
I decide to move my cavalry right back. If they hang around any longer they will be destroyed. One MC unit moves only one square since it began the turn out of command (not part of a battleline containing an uncharged unit with a leader). The Legions keep advancing, moving diagonally to engage the Carthaginian heavy infantry head-on. The Auxilia also move diagonally to the rear of the Legions - they won't be needed as a flank guard after all and serve better as a protective anti-cavalry second line behind the Legions.
Turn 3. Carthage.
Peter's MC charge my lone uncommanded MC unit which evades. His LH stay put. What are they up to?
Turn 4. Rome.
The Legions keep advancing and the Skirmisher Foot (Velites if you like) start shooting up the Poeni Foot and Warband. The cavalry meanwhile form up in a flank guard. The Auxilia spend a order point to stop as they cannot move diagonally any further with their current order. Stopping moves the orders counter into their commander's square (the round yellow thing for the Auxilia), so next turn they can continue moving diagonally again. Some things take time to do.
Turn 4. Carthage.
Peter's MC form column and move to the rear next to the LH who also form column. What are they up to? The Slingers on the other hand move up at full speed.
....and then the Poeni Foot and Warband charge the Roman Skirmisher Foot, obliging them to evade through the Legions. That was unexpected.
Turn 5. Rome.
The Legionaries aren't complaining. In they go, taking some knocks in the charge from the Warband. The Auxilia finally get into position behind the Legions whilst the lone MC unit also moves to the rear.
Turn 5. Carthage.
Peter reveals his plan. The advance of the Warband opened a gap on their right which the MC can exploit, whilst the LH move to the other flank. A classic double envelopment. Oh heck....
Turn 5. Melee.
The slow attritional grind begins.
Turn 6. Rome.
The two understrength MC units move to the flanks whilst my general's MC unit takes up position in the middle, ready to help either flank as needed. The Auxilia move up behind the Legions, ready to help protect them. I must keep Peter's cavalry away from my Legions whilst they engage the Carthaginian HI.
Turn 6. Carthage.
Peter's MC move into the ZOC of the MC unit on my left flank. The MC turn from column into line. This disorders the lead unit since it does it in an enemy ZOC but Peter decides that's acceptable. Meanwhile the LH get into position on my right flank, ready to sweep in. As a nice hors d'oeuvre his Slingers shoot my one MC unit to rout. Ouch!
Turn 6. Melee.
The main clash continues in the centre. The Legionaries just need time....
Turn 7. Rome.
Realising that my left flank guard MC is about to be routed, I move my general's MC unit across in support. The Auxilia will have to handle the Carthaginian LH on the other flank.
The Legions meantime execute line relief, returning to full morale.
Turn 7. Carthage.
In go the Carthaginian MC, charging one Legion and inflicting an all-grey negative modifier on it: from now on all firm morale intervals are treated as shaken and suffer a -1 modifier in combat in consequence. Besides inflicting this negative modifier, there's no actual resolution of combat. The other Carthaginian MC units charges my own MC. A drawn fight but things will be different in the melee.
The LH advance on my left. I'm beginning to feel like a lemon in a lemon squeezer.
Turn 7. Melee.
My MC unit routs as expected, but I notice the Carthaginian Warband are beginning to look pretty battered.
The victorious Carthaginian MC unit occupies the square vacated by the routed Roman MC unit.
Turn 8. Rome.
My Roman MC unit flank charges the Carthaginian MC, disordering it, whilst the Auxilia turn to face the music.
Turn 8. Carthage.
The LH charge the Auxilia, hammering them.
The Carthaginian MC that was charged in the flank turn to face the Roman MC just before melee.
Turn 8. Melee.
The Auxilia rout but so do the two Warband units!
Victorious units occupy the vacated squares.
Turn 9. Rome.
The free Legions do a 180 turn to face the Carthaginian cavalry in their rear.
Turn 9. Carthage.
The LH charge the next Auxilia unit whilst the unengaged (and uncommanded) MC units heads towards the flank of my engaged MC unit. Peter is steadily cleaning up my rear.
The charged Auxilia turn to face the LH before melee.
Turn 9. Melee.
The Caerthaginian MC unit routs as do the Poeni Foot. Peter has now lost all his HI.
The Legions and Roman MC occupy the vacated squares.
And then it's over. Carthage has lost enough stands for all its average units to automatically rout, which is the remainder of the army. Game over!
Peter had a good plan - advance his HI to allow his cavalry to execute a double envelopment past both flanks, but it just needed to be accomplished a little earlier.


